EMC Recoverpoint and XtremIO Part 3 – Come CG With Me

In this post we are going to configure a local consistency group within XtremIO, armed with our knowledge of the CG settings.  I want to configure one snap per hour for 48 hours, 48 max snaps.

Because I’m working with local protection, I have to have the full featured licensing (/EX) instead of the basic (/SE) that only covers remote protection.  Note: these licenses are different than normal /SE and /EX RP licenses!  If you have an existing VNX with standard /SE, then XtremIO with /SE won’t do anything for you!

I have also already configured the system itself, so I’ve presented the 3GB repository volume, configured RP, and added this XtremIO cluster into RP.

All that’s left now is to present storage and protect!  I’ve got a 100GB production LUN I want to protect.  I have actually already presented this LUN to ESX, created a datastore, and created a very important 80GB Eager Zero Thick VM on it.

cgcreate0

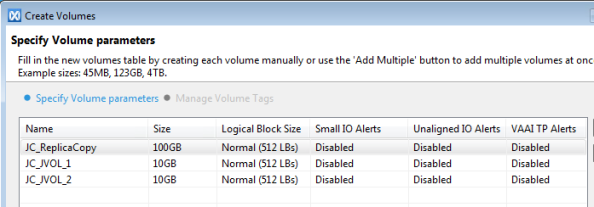
First thing’s first, I need to create a replica for my production LUN – this must be the exact same size as the production LUN, although again this is always my recommendation with RP anyway.  I also need to create some journal volumes as well.  Because this isn’t a distributed CG, I’ll be using the minimum 10GB sizing.  Lucky for us creating volumes on XtremIO is easy peasy.  Just a reminder – you must use 512 byte blocks instead of 4K, but you are likely using that already anyway due to lack of 4K support.

cgcreate1

Next I need to map the volume.  If you haven’t seen the new volume screen in XtremIO 4.0, it is a little different.  Honestly I kind of like the old one which was a bit more visual but I’m sure I’ll come to love this one too.  I select all 4 volumes and hit the Create/Modify Mapping button.  Side note: notice that even though this is an Eager Zero’d VM, there is only 7.1MB used on the volume highlighted below.  How?  At first I thought this was the inline deduplication, but XtremIO does a lot of cool things, and one neat thing it does is discard all ful-zero block writes coming into the box!  So EZTs don’t actually inflate your LUNs. 

cgcreate2

Next I choose the Recoverpoint Initiator group (the one that has ALL my RP initiators in it) and map the volume.  LUN IDs have never really been that important when dealing with RP, although in remote protection it can be nice to try to keep the local and remote LUN IDs matching up.  Trying to make both host LUN IDs and RP LUN ID match up is a really painful process, especially in larger environments, for (IMO) no real benefit.  But if you want to take up that, I won’t stop you Sysyphus!

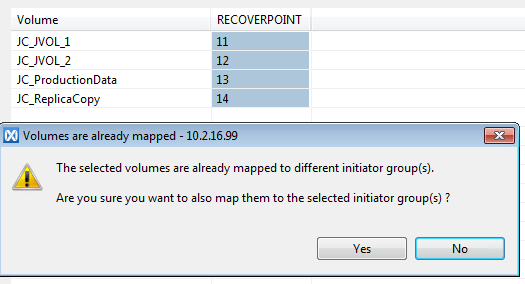
Notice I also get a warning because it recognizes that the Production LUN is already mapped to an existing ESX host.  That’s OK though, because I know with RP this is just fine.

cgcreate3

Alright now into Recoverpoint.  Just like always I go into Protection and choose Protect Volumes.

cgcreate4

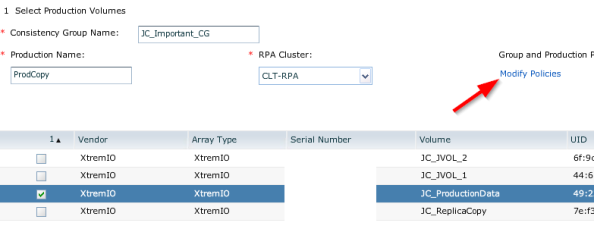
These screens are going to look pretty familiar to you if you’ve used RP before.  On this one, for me typically CG Name = LUN name or something like it, Production name is ProdCopy or something similar, and then choose your RPA cluster.  Just like always, it is EXTREMELY important to choose the right source and destinations, especially with remote replication.  RP will happily replicate a bunch of nothing into your production LUN if you get it backwards!  I choose my prod LUN and then I hit modify policies.

cgcreate5

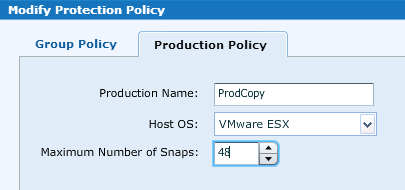
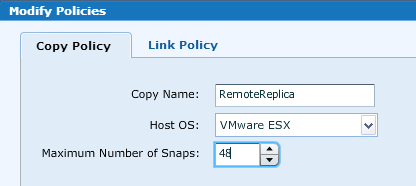
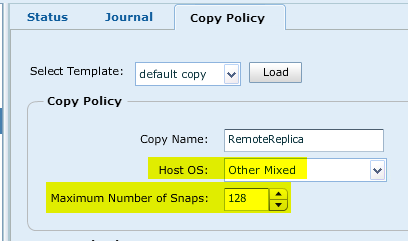
In modify policy, like normal I choose the Host OS (BTW I’ll happily buy a beer for anyone who can really tell me what this setting does…I always set it but have no idea what bearing it really has!) and now I set the maximum number of snaps.  This setting controls how many total snapshots the CG will maintain for the given copy.  If you haven’t worked with RP before this can be a little confusing because this setting is for the “production copy” and then we’ll set the same setting for the “replica copy.”  This allows you to have different settings in a failover situation, but most of the time I keep these identical to avoid confusion.  Anywho, we want 48 max snaps so that’s what I enter.

cgcreate6

I hit Next and now deal with the production journal.  As usual I select that journal I created and then I hit modify policy.

cgcreate7

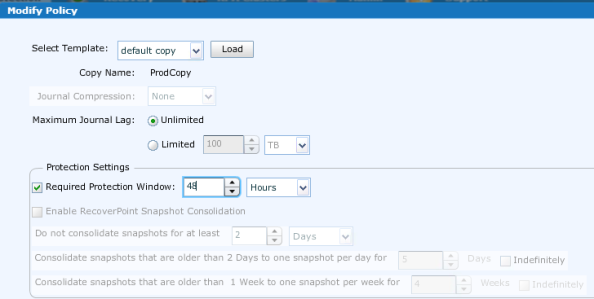
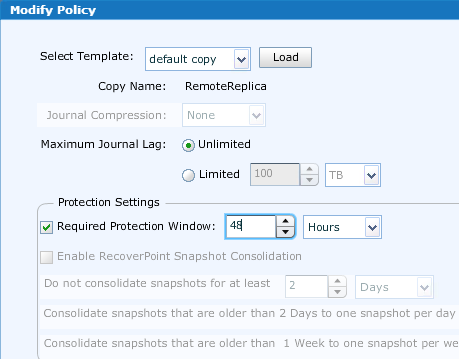
More familiar settings here, and because I want a 48 hour protection window, that’s what I set.  Again based on my experience this is an important setting if you only want to protect over a specific period of time…otherwise it will spread your snaps out over 30 days.  Notice that snapshot consolidation is greyed out – you can’t even set it anymore.  That’s because the new snapshot pruning policy has effectively taken its place!

cgcreate8

After hitting next, now I choose the replica copy.  Pretty standard fare here, but a couple of interesting items in the center – this is where you configure the snap settings.  Notice again that there is no synchronous replication; instead you choose periodic or continuous snaps.  In our case I choose periodic and a rate of one per 60 minutes.  Again I’ll stress, especially in a remote situation it is really important to choose the right RPA cluster!  Naming your LUNs with “replica” in the name helps here, since you can see all volume names in Recoverpoint.

cgcreate9

In modify policies again we set that host OS and a max snap count of 48 (same thing we set on the production side).  Note: don’t skip over the last part of this post where I show you that sometimes this setting doesn’t apply!

cgcreate11

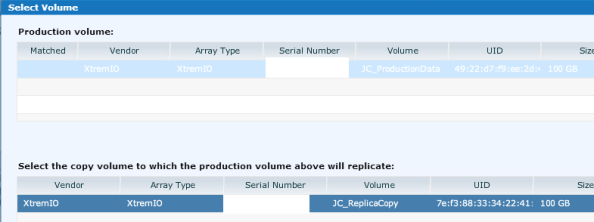
In case you haven’t seen the interface to choose a matching replica, it looks like this.  You just choose the partner in the list at the bottom for every production LUN in the top pane.  No different from normal RP.

cgcreate10

Next, we choose the replica journal and modify policies.

cgcreate12

Once again setting the required protection window of 48 hours like we did on the production side.

cgcreate13

Next we get a summary screen.  Because this is local it is kind of boring, but with remote replication I use this opportunity to again verify that I chose the production site and the remote site correctly.

cgcreate14

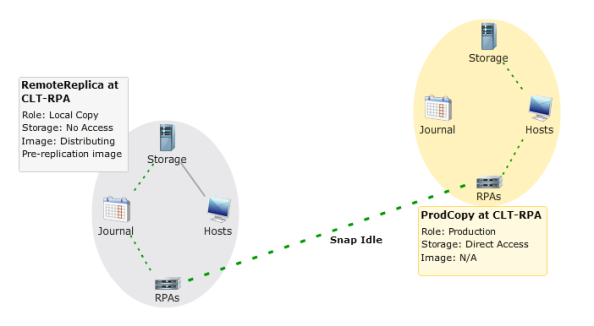
After we finish up, the CG is displayed like normal, except it goes into “Snap Idle” when it isn’t doing anything active.

cgcreate15

One thing I noticed the other day (and why I specifically chose these settings for this example) is that for some reason the replica copy policy settings aren’t getting set correctly sometimes.  See here, right after I finished up this example the replica copy policy OS and max snaps aren’t what I specified.  The production is fine.  I’ll assume this is a bug until told otherwise, but just a reminder to go back through and verify these settings when you finish up.  If they are wrong you can just fix them and apply.

cgcreate16

Back in XtremIO, notice that the replica is now (more or less) the same size as the production volume as far as used space.  Based on my testing this is because the data existed on the prod copy before I configured the CG.  If I configure the CG on a blank LUN and then go in and do stuff, nothing happens on the replica LUN by default because it isn’t rolling like it use to.  Go snaps!

cgcreate17

I’ll let this run for a couple of days and then finish up with a production recovery and a summary.

SAN vs NAS Part 1: Intro

Welcome to the New Year!

I wanted to write a blog post on a very confusing storage topic (at least for myself) but I have also been searching for another large scale topic similar to the set I wrote on RAID last year.  After thinking about it I feel like my confusing question is really just a subset of a misunderstanding about block storage.  So without further ado, I’m going to write up a pretty detailed break down of SAN (Storage Area Networks), or block storage, vs NAS (Network Attached Storage), or file storage.  This is another topic, like RAID, that is fundamental and basic but not always fully understood.

Certainly there are other write ups on this topic out there, and in ways this can be summed up in just a few bullet points.  But I think a larger discussion will really help solidify understanding.

The specific confusing question I’ll ask and hopefully answer is, with thin provisioned block storage, if I delete a ton of data out of a LUN, why do I not see any space returned on the storage array?  Say I’ve got a thin 1TB LUN on my VMAX, and it is currently using (allocated) 500GB of space.  I go to the server where this LUN is attached and delete 300GB of data.  Querying the VMAX, I still see 500GB of space used.

This concept is hard to understand and I’ve not only asked this question myself, I’ve fielded it from several people in a variety of roles.  Central to understanding this concept is understanding the difference between file and block storage.

To start out, let’s briefly define the nature of things about file and block storage.

SAN – Block Storage

The easiest way to think of SAN is a disk drive directly attached to a computer.  Block storage access is no different from plugging in a USB drive, or installing another hard drive into the server, as far as how the server accesses it.  The medium for accessing it over your SAN varies with protocols and hardware, but at the end of the day you’ve got a disk drive (block device) to perform I/O with.

NAS – File Storage

The idea with NAS is that you are accessing files stored on a file server somewhere.  So I have a computer system in the corner that has a network service running on it, and my computer on my desk connects to that system.  Generally this connection is going to be CIFS (for Windows) or NFS (for *nix/vSphere).  The file protocol here varies but we are (most of the time) going to be running over IP.  And yes, sometimes Linux folks access CIFS shares and sometimes Windows folks do NFS, but these are exceptions to the rule.

In part 2, I’ll be covering more of the differences and similarities between these guys.

VNX, Dedupe, and You

Block deduplication was introduced in Flare 33 (VNX2).  Yes, you can save a lot of space.  Yes, dedupe is cool.  But before you go checkin’ that check box, you should make sure you understand a few things about it.

As always, nothing can replace reading the instructions before diving in:

Click to access h12209-vnx-deduplication-compression-wp.pdf

Lots of great information in that paper, but I wanted to hit the high points briefly before I go over the catches.  Some of these are relatively standard for dedupe schemes, some aren’t:

  • 8KB granularity
  • Pointer based
  • Hash comparison, followed by a bit-level check to avoid hash collisions
  • Post-process operation on a storage pool level
  • Each pass starts 12 hours after the last one completed for a particular pool
  • Only 3 processes allowed to run at the same time; any new ones are queued
  • If a process runs for 4 hours straight, it is paused and put at the end of the queue.  If nothing else is in the queue, it resumes.
  • Before a pass starts, if the amount of new/changed data in a pool is less than 64GB the process is skipped and the 12 hour timer is reset
  • Enabling and disabling dedupe are online operations
  • FAST Cache and FAST VP are dedupe aware << Very cool!
  • Deduped and non-deduped LUNs can coexist in the same pool
  • Space will be returned to the pool when one entire 256MB slice has been freed up
  • Dedupe can be paused, though this does not disable it
  • When dedupe is running if you see “0GB remaining” for a while, this is the actual removal of duplicate blocks
  • Deduped LUNs within a pool are considered a single unit from FAST VP’s perspective.  You can only set a FAST tiering policy for ALL deduped LUNs in a pool, not for individual deduped LUNs in a pool.
  • There is an option to set dedupe rate – this adjusts the amount of resources dedicated to the process (i.e. how fast it will run), not the amount of data it will dedupe
  • There are two Dedupe statistics – Deduplicated LUN Shared Capacity is the total amount of space used by dedupe, and Deduplication and Snapshot Savings is the total amount of space saved by dedupe

Performance Implications

Nothing is free, and this check box is no different.  Browse through the aforementioned PDF and you’ll see things like:

Block Deduplication is a data service that requires additional overhead to the normal code path.

Leaving Block Deduplication disabled on response time sensitive applications may also be desirable

Best suited for workloads of < 30% writes….with a large write workload, the overhead could be substantial

Sequential and large block random (IOs 32 KB and larger) workloads should also be avoided

But the best line of all is this:

it is suggested to test Block Deduplication before enabling it in production

Seriously, please test it before enabling it on your mission critical application. There are space saving benefits, but that comes with a performance hit.  Nobody can tell you without analysis whether that performance hit will be noticeable or detrimental.  Some workloads may even get a performance boost out of dedupe if they are very read oriented and highly duplicated – it is possible to fit “more” data into cache…but don’t enable it and hope it will happen. Testing and validation is important!

Along with testing for performance, test for stability.  If you are using deduplication with ESX or Windows 2012, specific features (the XCOPY directive for VAAI, ODX for 2012) can cause deduped LUNs to go offline with certain Flare revisions.  Upgrade to .052 if you plan on using it with these specific OSes.  And again, validate, do your homework, and test test test!

The Dedupe Diet – Thin LUNs

Another thing to remember about deduplication is that all LUNs become thin.

When you enable dedupe, in the background a LUN migration happens to a thin LUN in the invisible dedupe container.  If your LUN is already thin, you won’t notice a difference here.  However if the LUN is thick, it will become thin whenever the migration completes.   This totally makes sense – how could you dedupe a fully allocated LUN?

When you enable dedupe the status for the LUN will be “enabling.”  This means it is doing the LUN migration – you can’t see it in the normal migration status area.

Thin LUNs have slightly lower performance characteristics than thick LUNs. Verify that your workload is happy on a thin LUN before enabling dedupe.

Also keep in mind that this LUN migration requires 110% of the consumed space in order to migrate…so if you are hoping to dedupe your way out of a nearly full pool, you may be out of luck.

One SP to Rule Them All

Lastly but perhaps most importantly – the dedupe container is owned by one SP.  This means that whenever you enable dedupe on the first LUN in a pool, that LUN’s owner becomes the Lord of Deduplication for that pool.  Henceforth, any LUNs that have dedupe enabled will be migrated into the dedupe container and will become owned by that SP.

This has potentially enormous performance implications with respect to array balance.  You need to be very aware of who the dedupe owner is for a particular pool.  In no particular order:

  • If you are enabling dedupe in multiple pools, the first LUN in each pool should be owned by differing SPs.  E.g. if you are deduping 4 different pools, choose an SPA LUN for the first one in two pools, and an SPB LUN for the first one in the remaining two pools.  If you choose an SPA LUN for the first LUN in all four pools, every deduped LUN in all four pools will be on SPA
  • If you are purchasing an array and planning on using dedupe in a very large single pool, depending on the amount of data you’ll be deduping you may want to divide it into two pools and alternate the dedupe container owner.  Remember that you can keep non-deduplicated LUNs in the pools and they can be owned by any SP you feel like
  • Similar to a normal LUN migration across SPs, after you enable dedupe on a LUN that is not owned by the dedupe container owner, you need to fix the default owner and trespass after the migration completes.  For example – the dedupe container in Pool_X is owned by SPA.  I enable dedupe on a LUN in Pool_X owned by SPB.  When the dedupe finishes enabling, I need to go to LUN properties and change the default owner to SPA.  Then I need to trespass that LUN to SPA.
  • After you disable dedupe on a LUN, it returns to the state it was pre-dedupe.  If you needed to “fix” the default owner on enabling it, you will need to “fix” the default owner on disabling.

What If You Whoopsed?

What if you checked that box without doing your homework?  What if you are seeing a performance degradation from dedupe?  Or maybe you accidentally have everything on your array now owned by one SP?

The good news is that dedupe is entirely reversible (big kudos to EMC for this one).  You can uncheck the box for any given LUN and it will migrate back to its undeduplicated state.  If it was thick before, it becomes thick again.  If it was owned by a different SP before, it is owned by that SP again.

If you disable dedupe on all LUNs in a given pool, the dedupe container is destroyed and can be recreated by re-enabling dedupe on something.  So if you unbalanced an array on SPA, you can remove all deduplication in a given pool, and then enable it again starting with an SPB LUN.

Major catch here – you must have the capacity for this operation.  A LUN requires 110% of the consumed capacity to migrate, so you need free space in order to undo this.

Deduplication is a great feature and can save you a lot of money on capacity, but make sure you understand it before implementing!