EMC Recoverpoint and XtremIO Part 4 – Recovery and Summary

In this final post we are going to cover a simple recovery, as well as do a quick summary.  I’ll throw in a few bonus details for free.

Recovery

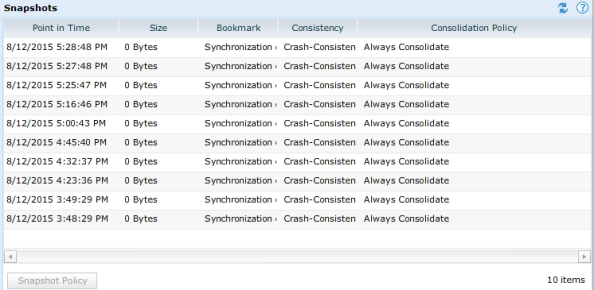
Our CG has been running now for over 48 hours with our configuration – 48 hours Required Protection Window, 48 max snaps, one snap per hour.  Notice below that I have exactly (or just under, depending on how you measure) a 48 hour protection window.  I have one snap per hour for 48 hours and that is what is retained.  This is because of how I constructed my settings!

xsumm1

If I reduce my Required Protection Window to 24 hours, notice that IMMEDIATELY the snaps past 24 hours are nuked:

xsumm2

The distribution of snaps in this case wouldn’t be different because of how the CG is constructed (one snap per hour, 48 max snaps, 24 hour protection window = 1 snap per hour for 24 hours), but again notice that the Required Protection Window is much more than just an alerting setting in RP+XtremIO.

Alright, back to our recovery example.  Someone dumb like myself ignored all the “Important” naming and decided to delete that VM.

xsumm3

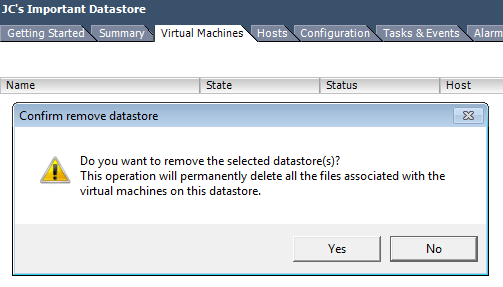
Even worse, they decided to just delete the entire datastore afterwards.

xsumm4

But lucky for us we have RP protection enabled.  I’m going to head to RP and use the Test a Copy and Recover Production button.

xsumm5

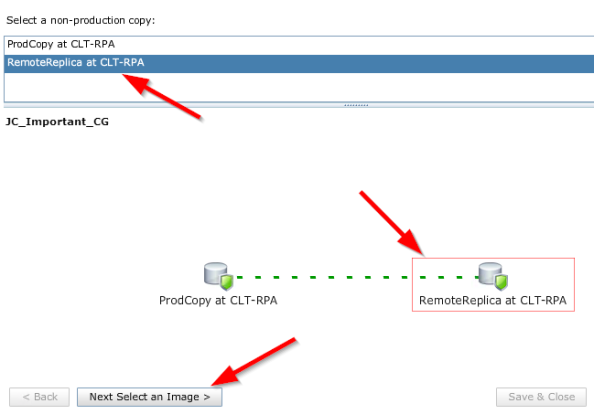
I’ll choose my replica volume:

xsumm6

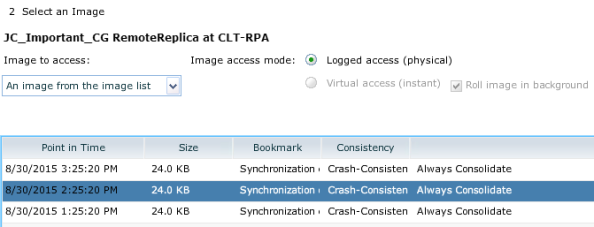
Then I decide I don’t want to use the latest image because I’m worried that the deletion actually exists in that snapshot.  I choose one hour prior to the latest snap.  Quick note: see that virtual access is not even available now?  That’s because with snap based promotion there is no need for it.  Snaps are instantly promoted to the actual replica LUN, so physical access is always available and always immediate no matter how old the image.

xsumm7

After I hit next, it spins up the Test a Copy screen.  Now normally I might want to map this LUN to a host and actually check it to make sure that this is a valid copy.  In this case because, say, I’ve tracked the bad user’s steps through vCenter logging, I know exactly when I need to recover.  An important note though, as you’ll see in a second all snapshots taken AFTER your recovery image will be deleted!  But again, because I’m a real maverick I just tell it go to ahead and do the production recovery.

xsumm8

It gives me a warning that prod is going to be overwritten, and that data transfer will be paused.  It doesn’t warn you about the snapshot deletion but this has historically been RP behavior.

xsumm9

On the host side I do a rescan, and there’s my datastore.  It is unmounted at the moment so I’ll choose to mount it.

xsumm10

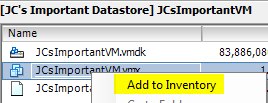
Next, because I deleted that VM I need to browse the datastore and import the VMX file back into vCenter.

xsumm11 xsumm12

And just like that I’ve recovered my VM.  Easy as pie!

xsumm13

Now, notice that I recovered using the 2:25 snap, and below this is now my snapshot list.  The 3:25 and the 2:25 snap that I used are both deleted.  This is actually kind of interesting because an awesome feature of XtremIO is that all snaps (even snaps of snaps) are independent entities; intermediate snaps can be deleted with no consequence.  So in this case I don’t necessarily think this deletion of all subsequent snaps is a requirement, however it certainly makes logical sense that they should be deleted to avoid confusion.  I don’t want a snapshot of bad data hanging around in my environment.

xsumm14

Summary

In summary, it looks like this snap recovery is fantastic as long as you take the time to understand the behavior.  Like most things, planning is essential to ensure you get a good balance of your required protection and capacity savings.  I hope for some more detailed breakdowns from EMC on the behavior of the snapshot pruning policies, and the full impact that settings like Required Protection Window have in the environment.

Also, don’t underestimate the 8,192 max snaps+vols for a single XMS system, especially if you are managing multiple clusters per XMS!  If I had to guess I would guess that this value will be bumped up in a future release considering these new factors, but in the meantime make sure you don’t overrun your environment.  Remember, you can still use a single XMS per cluster in order to sort of artificially inflate your snap ceiling.

Bonus Deets!

A couple of things of note.

First, in my last post I stated that I had notice a bug with settings not “sticking.”  After talking with a customer, he indicated this doesn’t have to do with the settings (the values) but with the process itself.  Something about the order is important here.  And now I believe this to be true because if I recreate a CG with those same busted settings, it works every time!  I can’t get it to break. 🙂  I still believe this to be a bug so just double check your CG settings after creating.

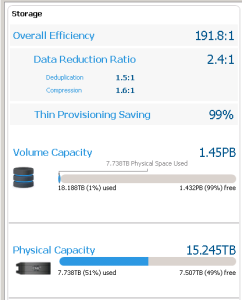
Second, keep in mind that today XtremIO dashboard settings display your provisioned capacity based on volumes and snapshots on the system, with no regard for who created those snaps.  So you can imagine with a snap based recovery tool, things get out of hand quickly. I’m talking about 1.4PB (no typo – PETAbytes) “provisioned” on a 20TB brick!

DC2_20T

While this is definitely a testament to the power (or insanity?) of thin provisioning, I’m trying to put in a feature request to get this fixed in the future because it really messes with the dashboard relevance.  But for the moment just note that for anything you protect with RP:

  • On the Production side, you will see a 2x factor of provisioning.  So if you protected 30TB of LUNs, your provisioned space (from those LUNs) will be 60TB.
  • On the Replica side, you will see a hilarious factor of provisioning, depending on how many snaps you are keeping.

I hope this series has been useful – I’m really excited about this new technology pairing!

EMC Recoverpoint and XtremIO Part 3 – Come CG With Me

In this post we are going to configure a local consistency group within XtremIO, armed with our knowledge of the CG settings.  I want to configure one snap per hour for 48 hours, 48 max snaps.

Because I’m working with local protection, I have to have the full featured licensing (/EX) instead of the basic (/SE) that only covers remote protection.  Note: these licenses are different than normal /SE and /EX RP licenses!  If you have an existing VNX with standard /SE, then XtremIO with /SE won’t do anything for you!

I have also already configured the system itself, so I’ve presented the 3GB repository volume, configured RP, and added this XtremIO cluster into RP.

All that’s left now is to present storage and protect!  I’ve got a 100GB production LUN I want to protect.  I have actually already presented this LUN to ESX, created a datastore, and created a very important 80GB Eager Zero Thick VM on it.

cgcreate0

First thing’s first, I need to create a replica for my production LUN – this must be the exact same size as the production LUN, although again this is always my recommendation with RP anyway.  I also need to create some journal volumes as well.  Because this isn’t a distributed CG, I’ll be using the minimum 10GB sizing.  Lucky for us creating volumes on XtremIO is easy peasy.  Just a reminder – you must use 512 byte blocks instead of 4K, but you are likely using that already anyway due to lack of 4K support.

cgcreate1

Next I need to map the volume.  If you haven’t seen the new volume screen in XtremIO 4.0, it is a little different.  Honestly I kind of like the old one which was a bit more visual but I’m sure I’ll come to love this one too.  I select all 4 volumes and hit the Create/Modify Mapping button.  Side note: notice that even though this is an Eager Zero’d VM, there is only 7.1MB used on the volume highlighted below.  How?  At first I thought this was the inline deduplication, but XtremIO does a lot of cool things, and one neat thing it does is discard all ful-zero block writes coming into the box!  So EZTs don’t actually inflate your LUNs. 

cgcreate2

Next I choose the Recoverpoint Initiator group (the one that has ALL my RP initiators in it) and map the volume.  LUN IDs have never really been that important when dealing with RP, although in remote protection it can be nice to try to keep the local and remote LUN IDs matching up.  Trying to make both host LUN IDs and RP LUN ID match up is a really painful process, especially in larger environments, for (IMO) no real benefit.  But if you want to take up that, I won’t stop you Sysyphus!

Notice I also get a warning because it recognizes that the Production LUN is already mapped to an existing ESX host.  That’s OK though, because I know with RP this is just fine.

cgcreate3

Alright now into Recoverpoint.  Just like always I go into Protection and choose Protect Volumes.

cgcreate4

These screens are going to look pretty familiar to you if you’ve used RP before.  On this one, for me typically CG Name = LUN name or something like it, Production name is ProdCopy or something similar, and then choose your RPA cluster.  Just like always, it is EXTREMELY important to choose the right source and destinations, especially with remote replication.  RP will happily replicate a bunch of nothing into your production LUN if you get it backwards!  I choose my prod LUN and then I hit modify policies.

cgcreate5

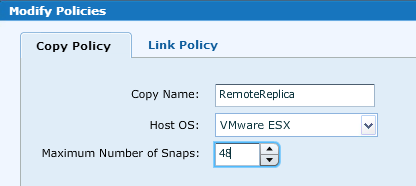
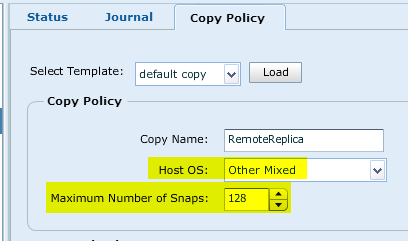
In modify policy, like normal I choose the Host OS (BTW I’ll happily buy a beer for anyone who can really tell me what this setting does…I always set it but have no idea what bearing it really has!) and now I set the maximum number of snaps.  This setting controls how many total snapshots the CG will maintain for the given copy.  If you haven’t worked with RP before this can be a little confusing because this setting is for the “production copy” and then we’ll set the same setting for the “replica copy.”  This allows you to have different settings in a failover situation, but most of the time I keep these identical to avoid confusion.  Anywho, we want 48 max snaps so that’s what I enter.

cgcreate6

I hit Next and now deal with the production journal.  As usual I select that journal I created and then I hit modify policy.

cgcreate7

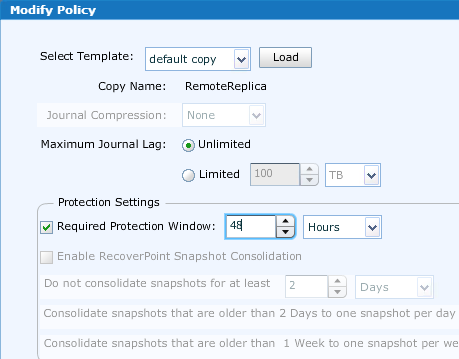
More familiar settings here, and because I want a 48 hour protection window, that’s what I set.  Again based on my experience this is an important setting if you only want to protect over a specific period of time…otherwise it will spread your snaps out over 30 days.  Notice that snapshot consolidation is greyed out – you can’t even set it anymore.  That’s because the new snapshot pruning policy has effectively taken its place!

cgcreate8

After hitting next, now I choose the replica copy.  Pretty standard fare here, but a couple of interesting items in the center – this is where you configure the snap settings.  Notice again that there is no synchronous replication; instead you choose periodic or continuous snaps.  In our case I choose periodic and a rate of one per 60 minutes.  Again I’ll stress, especially in a remote situation it is really important to choose the right RPA cluster!  Naming your LUNs with “replica” in the name helps here, since you can see all volume names in Recoverpoint.

cgcreate9

In modify policies again we set that host OS and a max snap count of 48 (same thing we set on the production side).  Note: don’t skip over the last part of this post where I show you that sometimes this setting doesn’t apply!

cgcreate11

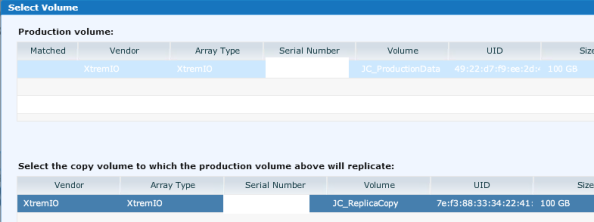
In case you haven’t seen the interface to choose a matching replica, it looks like this.  You just choose the partner in the list at the bottom for every production LUN in the top pane.  No different from normal RP.

cgcreate10

Next, we choose the replica journal and modify policies.

cgcreate12

Once again setting the required protection window of 48 hours like we did on the production side.

cgcreate13

Next we get a summary screen.  Because this is local it is kind of boring, but with remote replication I use this opportunity to again verify that I chose the production site and the remote site correctly.

cgcreate14

After we finish up, the CG is displayed like normal, except it goes into “Snap Idle” when it isn’t doing anything active.

cgcreate15

One thing I noticed the other day (and why I specifically chose these settings for this example) is that for some reason the replica copy policy settings aren’t getting set correctly sometimes.  See here, right after I finished up this example the replica copy policy OS and max snaps aren’t what I specified.  The production is fine.  I’ll assume this is a bug until told otherwise, but just a reminder to go back through and verify these settings when you finish up.  If they are wrong you can just fix them and apply.

cgcreate16

Back in XtremIO, notice that the replica is now (more or less) the same size as the production volume as far as used space.  Based on my testing this is because the data existed on the prod copy before I configured the CG.  If I configure the CG on a blank LUN and then go in and do stuff, nothing happens on the replica LUN by default because it isn’t rolling like it use to.  Go snaps!

cgcreate17

I’ll let this run for a couple of days and then finish up with a production recovery and a summary.

EMC Recoverpoint and XtremIO Part 2 – Make It Snappy

In this post we are going to explore the new snap based protection with Recoverpoint and XtremIO.  It is worth noting that some of this is based on my observations and testing, and encourage you to do the same in your environment.  Take snaps, try to recover, etc.  I used a relatively small sample size and testing criteria.

Also worth noting – you aren’t supposed to manually interact with the snapshots that RP is taking, and in fact you can’t even see them when logged in as admin.  However if you log in as tech or rp_user, you can see them and optionally interact with them.  But again remember, if you manually interact with these pieces you may cause issues in your environment!  Leave this type of stuff to the testers or in test environments.

Snap Based Replication Behavior

So, snap based replication – what is is and how is it different?

Well standard Recoverpoint is pretty well documented but the idea is each write is:

  1. Split at the source array
  2. Sent to the remote array
  3. Finally applied to the journal volume there.

At a later time, this write will be applied to the replica LUN.  So the journals contain a timeline of writes, and the replica LUN is somewhere alone that timeline at any given moment.  No real clue where, but when you go to access an image the system (with direct access) the system will “roll” the replica using the write timeline to where ever you wanted.

Snap based replication is literally nothing like this.  Instead it operates like this.  Again I’m writing this based on my reading of the tech notes as well as what I “see” between RP and XtremIO.  I write this from the perspective of a single source/replica combo but obviously you can have multiples just like always.

  1. Source LUN and Replica LUN (along with a single source and replica journal – remember no need to have large journals or even multiple journals) form a consistency group.
  2. On the source LUN, a snap is created that is labeled “SMP” – likely a reference to snapshot mount point, even though these don’t really exist on XtremIO.  All snaps are just disks.
  3. On the DR side, the DR LUN also has a snap created that is SMP.
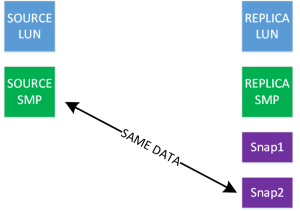
  4. On the DR side, two sub-snaps of the SMP are created called Volume##### (some incremental volume number).  Presumably the first is the state of the LUN as it started with and the next is where the changes are headed.  At this point if you look inside RP at the DR journal, you will see two snaps.  Regardless…
  5. All changes (current contents of SMP) are sent across to the DR side.  So at this point we’ve got Source LUN and Source SMP snap.  We’ve also got DR LUN, DR SMP snap, and 2 x sub snaps.snap1
  6. At some point (depending on how you’ve configured things) the system will:
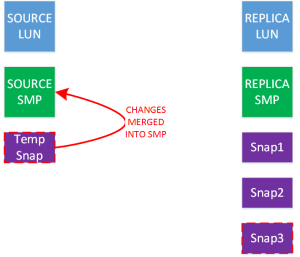
    1. Take another prod side snap and DR snap, both Volume##### snaps. On the prod side, this snap is temporary because the differences between it and the prod SMP LUN represent the changes that need to be sent across.  snap2
    2. These changes are sent across and injected into the DR snapshot, which is your newest snapshot for recovery.  snap3
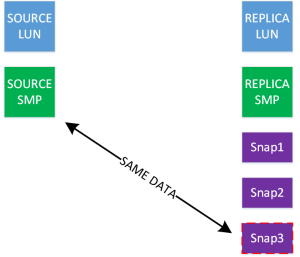
    3. Once this is complete, the temporary snap on the source is merged into the SMP snap, which now represents the state of the source LUN from last replication.snap4

Now the source SMP and the latest snap are identical.

snap5

This process repeats indefinitely and represents your ongoing protection    .

So clearly a departure from what we are used to.  Because all changes are stored in snapshots, no journal space is necessary for storing writes.  And there is also no need to keep rolling the replica either, because the recovery points on RP are in-memory snapshots on XtremIO (pointer based) which can be promoted or merged at any time near instantaneously. I self-confirmed no replica rolling by:

  1. Configuring a CG on a blank LUN and letting replication start rolling through snaps.
  2. Mounting prod LUN on vSphere and create VMFS datastore, noting some activity in the snaps.
  3. Waited a few more replication cycles
  4. Paused CG
  5. Unmounted/unmapped prod LUN
  6. Manually mapped replica LUN
  7. Mounted/attached replica LUN in vSphere, but it does not contain a VMFS file system.  This is just a raw LUN, indicating that there is no more replica rolling in the background.
  8. Unmounted/unmapped replica LUN
  9. Enabled image access on newest snapshot
  10. Mapped/mounted/attached replica LUN in vSphere.  Now the VMFS file system is there.
  11. Detached replica and disabled image access.
  12. Reattached replica LUN, VMFS file system is still there.  So it didn’t try to restore the “nothing” that was in the LUN to begin with since there is no good reason to do that.

One thing I didn’t test is whether the snaps get merged into the replica LUN as they roll off the image list.  I don’t think this is the case – I think they are actually merged into the DR side SMP LUN, though I haven’t confirmed.

But either way, again, very cool how this new functionality leverages XtremIO snaps for efficient replication.

Image Access

Another nice change is that image access no longer uses the journal, because essentially all changes are snap based and stored in the XtremIO pool.  So no worries about long term image access and filling up the log.

I did image access on a raw LUN and presented to vSphere. Created a new datastore and deployed an EZT VMDK.  In the RP GUI, there was no extra activity on the journal side.

Interestingly, the “undo writes” button still works.  In this case I unmounted that LUN from vSphere and clicked undo writes.  When I attempted to remount/readd, there was no datastore on it.

Consistency Group Snapshot Behavior

When you configure a consistency group, you will configure a few parameters related to your protection.  The first is Maximum Number of Snapshots.  This is the total amount of snapshots that consistency group will retain, and goes up to 500.  Don’t forget that there is a per-XMS limitation of 8,192 total volumes + snapshots!  If you configure 500 snaps per group then you’ll probably run out quickly and won’t even be able to create new LUNs on XtremIO.

The other parameter you’ll configure is the type of protection you want.  There is no synchronous mode with RP+XtremIO.  Instead you choose Continuous which essentially creates a new snap as soon as the previous one is done transferring, or Periodic which will take snaps every X minutes.

With Continuous there isn’t really anything else to configure.  You can configure an RPO in minutes, but this is allegedly just an alerting mechanism.

With Periodic, you do tell it how often to take the snaps.  You can configure down to a per minute snapshot if you want.

Alright, so now the weirdness – the snapshot pruning policy.  The snapshot pruning policy is designed to give you a nice “spread” of snapshots.  This is listed in the whitepaper as follows (these percentages are not currently adjustable):

Age of snapshots // Percentage of total

  • 0–2 hours // 40%
  • 2–24 hours // 30%
  • 1–2 days // 20%
  • 2–4 days // 5%
  • 5–30 days // 5%

This is kind of helpful, except they don’t really tell you how or when this policy is applied.  In my testing, here is what I believe to be true.

  1. Unlike previous versions, the “Required Protection Window” setting actively alters what snapshots are removed.  In classic RP, required protection window was simply an alerting mechanism.  Now it appears that if you configure a required protection window of Z hours with X snapshots, most of the time the system will work to stagger those out so you will have X snapshots distributed throughout your Z hours.
    1. For instance, if you told the system I want periodic snaps every minute, 10 maximum snapshot count, and a required protection window of 5 hours, it will start out by taking one snap a minute for 10 minutes.  5_hr_window_1 After that, it will begin deleting snaps in the middle but preserving the first ones it took. Here I still have 2 of the first snaps it took, but a lot of intermediary ones have been purged.5_hr_window_2 It will continue this process until you get to the 5 hour mark, when it starts purging the oldest snap.  So you will end up with a 5 hour rolling protection window at the end of the day.  Same thing if you said 12 hour, or 1 day, or 1 week, etc.
    2. If you reduce your Required Protection Window, the system will immediately purge snapshots.  So for instance if I have my 5 hour window as in my previous example, with 5 hours worth of snaps, and I reduce my Required Protection Window to 3 hours, any snaps past 3 hours are immediately deleted.
  2. By default (again, I believe this to be true), a consistency group will have an unwritten Required Protection Window of 1 month.  I noticed while tinkering around that if a CG doesn’t have a Protection Window set, it looks like it will try to go for 30 days worth of snaps.  And sometimes (in the midst of testing copies and other things) it actually set a 30 day window on the CG without my interaction.
  3. If the protection window is 1 or 2 hours, no snapshot pruning is done.  This kind of matches up with the stated pruning policy which starts to delineate after 2 hours.  But e.g. if I configure a CG with 10 snap max, 1 per minute, and a 1 or 2 hour required protection window, then my actual recovery will only ever be 10 minutes long and I will never meet my specified requirements.  After 10 snaps exist, the newest snap always replaced the old one.  BUT!  If I set my Required Protection Window to 3+ hrs, then it starts doing the odd pruning/purging so that my total protection window is met.
  4. The pruning behavior seems to be the same whether you have Periodic snaps or Continuous snaps in place.

Again I found this to be a little odd and hope there is some clearer documentation in the future, but in the meantime this is my experience.

EMC RecoverPoint and XtremIO Part 1 – Initial Findings and Requirements

Back in the saddle again after a long post drought!  I’ve been busy lately working on some training activities with pluralsight, as well as dealing with a company merger.  I’m no longer with Varrow, as Varrow was acquired by Sirius Computer Solutions.  And enjoying time with my son, who is about to turn 1 year old – hard to believe!

Over the past couple of weeks, I’ve been involved in some XtremIO and Recoverpoint deployments.  RP+XtremIO just released not too long ago and it has been a bit of a learning curve – not with the product itself, but with the new methodology.  I wanted to lay out some details in case anyone is looking at this solution.

There is a good whitepaper on support.emc.com called Recoverpoint Deploying with XtremIO Tech Notes.  It does a good job of laying out the functionality, but for me at least still missed some important details – or maybe just didn’t phrase them so I could understand.

First, great news, from a functional standpoint this solution is roughly the same as all other RP implementations.  The same familiar interface is there, you create CGs and can do things like test a copy, recover production, and failover.  So if you are familiar with Recoverpoint protection operationally there is not a lot of difference.

Under the covers, things are hugely different.  I’m going to talk about the snap based replication a little later, and probably in part 2 as well.

First, the actual deployment is roughly the same.  Don’t forget your code requirements:

  • RecoverPoint 4.1.2 or later
  • XtremIO 4.0 or later

RP is deployed with Deployment Manager as usual, and XtremIO is configured as usual. 3GB repository volume (as usual!).

RP to XtremIO zoning is simple – everything to everything.  A single zone with all RP ports and all XtremIO ports from a single cluster in each fabric.

With the new 4.0 code, a single XtremIO Management Server (XMS) can manage multiple clusters.  Even though it would probably work, I would use a single zone per fabric for each cluster regardless of whether it is in the same XMS or not. More on the multi-cluster XMS with Recoverpoint later…

When you go to add XtremIO arrays into RP, you’ll use the XMS IP, and then a new rp_user account.  I’m not sure what the default password here is, so I just reset the password using the CLI.  If you have pre-zoned, you just select the XtremIO array from the list, give the XMS IP and rp_user creds.  If you haven’t pre-zoned, you also have to enter the XtremIO serial as well.

add_array

Here is the “I didn’t zone already” screen.  If you did pre-zone, you’ll see your serial in the list at the top and don’t need to enter it below.  Port 443 is required to be open between RP, XMS, and SCs.  Port 11111 is required between RP and SCs.  Usually this is in the same data center so not a huge deal.

Once the arrays have been added in and your RP cluster is configured like you want it, the rest is again same as usual.

  1. Create initiator group on XtremIO for Recoverpoint with all RP initiators.
  2. Create journal volumes, production volumes, and replica volumes.
  3. Present them to RecoverPoint
  4. Configure consistency groups.  Here there are important things to understand about the snap-based protection schemes, that I’ll go over later.

One important change due to the snap based recovery – no recovery data is stored in journals, only metadata related to snapshots!  Because of this, journals need to be as small as possible – 10GB for normal CGs, 40GB for distributed.  They won’t use all this space but we don’t care (assuming your jvols are on XtremIO) because XtremIO is thin anyway.  Similarly, each CG only needs one journal, as your protection window is not defined by your total journal capacity.

RP with XtremIO licensing is pretty simple.  You can either buy a basic (“/SE”) or full (“/EX”) license for your brick size.  Either way you can protect as much capacity as you can create, which is nice considering XtremIO is thin and does inline dedupe/compression.  Essentially basic just gives you remote protection, XtremIO to XtremIO only, only 1 remote copy.  Full adds in the ability to do local, as well as go from anything to anything (e.g. XtremIO to VNX, or VMAX to XtremIO), and a 3rd copy (so production, local, and remote, or production and two remote).  Obviously you need EX or CL licensing for the other arrays if you are doing multiple types.  Just a point of clarification here, the “SE” and “EX” for XtremIO are different than normal.  So if you have a VNX with /SE licensing, you can’t use it with /SE (or even /EX) XtremIO licensing. 

If you are using iSCSI with XtremIO, you can still do RP in direct attach mode, similar to what we do on VNX iSCSI.  Essentially you will direct attach  up to two bricks directly to your exactly 2 node RP cluster.  I would imagine (though not confirmed) that you could have more than two bricks, but only would attach two of them to RPAs.  vRPA is not currently supported – this remains a Clariion/VNX/VNXe only product.

I’m going to cover some details about the snap based protection in the next post, but in the meantime know that because it IS all snap based and there is no data in the journal to “roll” to, that image access is always direct and it is always near instantaneous.  It doesn’t matter if you are trying to access an image from 1 minute ago that has 4KB worth of changes, or an image from a week ago with 400GB worth of changes.  This part is very cool, as there is no need to worry about rolling.  There is also no need to worry about the undo log for image access – with traditional recoverpoint you were “gently encouraged” 🙂 to not image access for a long time, because as the writes piled up, eventually replication would halt.  And there was a specific capacity for the undo log.

Instead now the only capacity based limit you are concerned about is the physical capacity on the XtremIO brick itself.

Allegedly Site Recovery Manager is supported but I didn’t do any testing with that.

RP only supports volumes from XtremIO that use 512 as the logical block size, not the 4K block size.  Although there is such little support for 4K block size now I’m still strongly discouraging anyone to use that, unless they have tons of sign off and have done tons of testing.  But if you are using 4K block size, then you won’t be able to use RP protection.  Just to clarify, this is the setting I’m talking about – this is unrelated to FS block sizing a-la NTFS or anything of that nature.

4kblock

A few other random caveats:

  • If one volume at a copy is on an XtremIO array, then all volumes at that copy must be on that XtremIO array.  So for a given single copy (all the volumes in a copy), you can’t split them between array types or even clusters due to snapshotting.
  • There must be a match between production and the replica size, although I always recommend this anyway.
  • Resize for volumes is unfortunately back at the old way.  Remove both prod/replica volumes from CG, resize, then re-add.  Hopefully a dynamic resize will be available at some point.

In the next post I’m going to talk about some things I know and some things I’ve observed during testing with the snapshotting behavior, but I wanted to call out a specific limitation right now and will probably hammer on it later – there is an 8,192 limit of total volumes + snapshots per XMS irrespective of Recoverpoint.  This sounds like a ton, but each production volume you protect will have (at times) two snapshots associated with it.  Each replica volume will have max_snaps + 1 snapshots associated with it.  Because this is a per XMS limitation and not a per cluster limitation, depending on exactly how many volumes you have and how many snapshots you want to keep, you may still want a single XMS per cluster in a multi-cluster configuration.

More to come!

EMC RecoverPoint Journal Sizing

A commenter on my post about RecoverPoint Journal Usage asks:

How can I tell if my journal is large enough for a consistency group? That is to say, where in the GUI will it tell me I need to expand my journal or add another journal lun?

This is an easy question to answer but for me this is another opportunity to re-iterate journal behavior.  Scroll to the end if you are in a hurry.

Back to Snapshots…

Back to our example in the previous article about standard snapshots – on platforms where snapshots are used you often have to allocate space for this purpose…like with SnapView on EMC VNX and Clariion, you have to allocate space via a Reserve LUN pool.  On NetApp systems this is called the snapshot reserve.

Because of snapshot behavior (whether Copy On First Write or Redirect On Write), at any given time I’m using some variable amount of space in this area that is related to my change rate on the primary copy.  If most of my data space on the primary copy is the same as when I began snapping, I may be using very little space.  If instead I have overwritten most of the primary copy, then I may be using a lot of space.  And again, as I delete snapshots over time this space will free up.  So a potential set of actions might be:

  1. Create snapshot reserve of 10GB and create snapshot1 of primary – 0% reserve used
  2. Overwrite 2.5GB of data on primary – 25% reserve used
  3. Create snapshot2 of primary and overwrite a different 2.5GB of data on primary – 50% reserve used
  4. Delete snapshot1 – 25% reserve used
  5. Overwrite 50GB of data – snapshot space full (probably bad things happen here…)

There is meaning to how much space I have allocated to snapshot reserve.  I can have way too much (meaning my snapshots only use a very small portion of the reserve) and waste a lot of storage.  Or I can have too little (meaning my snapshots keep overrunning the maximum) and probably cause a lot of problems with the integrity of my snaps.  Or it can be just right, Goldilocks.

RP Journal

Once again the RP journal does not function like this.  Over time we expect RP journal utilization to be at 100%, every time.  If you don’t know why, please read my previous post on it!

The size of the journal only defines your protection window in RP.  The more space you allocate, the longer back you are able to recover from.  However, there is no such thing as “too little” or “too much” journal space as a rule of thumb – these are business defined goals that are unique to every organization.

I may have allocated 5GB of journal space to an app, and that lets me recover 2 weeks back because it has a really low write rate.  If my SLA requires me to recover 3 weeks back, that is a problem.

I may have allocated 1TB of journal space to an app, and that lets me recover back 30 minutes because it has an INSANE write rate.  If my SLA only requires me to recover back 15 minutes, then I’m within spec.

RP has no idea about what is good journal sizing or bad journal sizing, because this is simply a recovery time line.  You must decide whether it is good or bad, and then allocate additional journals as necessary.  Unlike other technology like snapshots, there is no concept of “not enough journal space” beyond your own personal SLAs. In this manner, by default RecoverPoint won’t let you know that you need more journal space for a given CG because it simply can’t know that.

Note: if you are regularly using the Test A Copy functionality for long periods of time (even though you really shouldn’t…), then you may run into sizing issues beyond just protection windows, as portions of the journal space are also used for that.  This is beyond the scope of this post, but just be aware that even if you are in spec from a protection window standpoint, you may need more journal space to support the test copy.

Required Protection Window

So RecoverPoint has no way of knowing whether you’ve allocated enough journal space to a given CG.  Folks on the pre-sales side have some nifty tools that can help with journal sizing by looking at data change rate, but this is really for the entire environment and hopefully before you bought it.

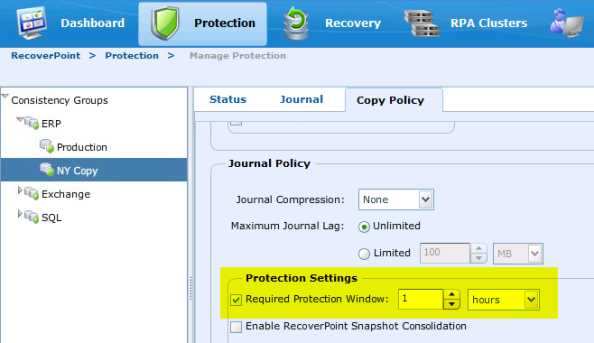
Luckily, RecoverPoint has a nice internal feature to alert you whether a given Consistency Group is within spec or not, and that is “Required Protection Window.”  This is a journal option within each copy and can be configured when a CG is created, or modified later.  Here is a pic of a CG without it.  Note that you can still see your current protection window here and make adjustments if you need.rpj1

Here is where the setting is located.

rpj2

And here is what it looks like with the setting enabled.

rpj3

So if I need to recover back 1 hour on this particular app, I set it to 1 hour and I’m good.  If I need to recover back 24 hours, I set it that way and it looks like I need to allocate some additional journal space to support that.

Now this does not control behavior of RecoverPoint (unlike, say, the Maximum Journal Lag setting) – whether you are within or under your required protection window, RP still functions the same.  It simply alerts you that you are under your personally defined window for that CG.  And if you are under for too long, or maybe under it at all if it is a mission critical application, you may want to add additional journal space to extend your protection window so that you are within spec.  Again I repeat, this is only an alerting function and will not, by itself, do anything to “fix” protection window problems!

Summary

So bottom line: RP doesn’t – or more accurately can’t – know whether you have enough journal space allocated to a given CG because that only affects how long you can roll back for.  However, using the Required Protection Window feature, you can tell RP to alert you if you go out of spec and then you can act accordingly.

How Much Journal Space Will EMC RecoverPoint use?

I see this question asked relatively frequently, and it is super easy to answer.  However I wanted to provide some context so that folks can understand a little better about how RecoverPoint works, and why the journal works the way it does.

The Answer

First – how much journal space will RecoverPoint use?  All of it.  Every time.  If you allocate 10GB of journal space to a Consistency Group, RP will use all of it.  And if you allocate 100GB to that same CG (or 500GB), it will again use all of it.  Depending on the write rate, it may take a very long time to fill up, but eventually it will use it all.

(Now, the journal itself is divided into different areas and for actually storing snapshots it is only able to use part of the total capacity, the rest of it being reserved.  But we are just talking about the snapshot area)

The Reason

The reason this happens is due to how RecoverPoint functions as compared to other technologies where you might allocate capacity for recovery, like snapshot storage space.

Let’s take a moment to discuss snapshot technology, as with VNX snapshots.  In this case you don’t allocate capacity for anything – it just uses free pool space – but the space utilization mechanism is very similar to all snapshot methods.  A snapshot is taken at some point in time, and all blocks are “frozen” at that time in the snapshot.  As changes are made to the real data, one way or another the original data makes its way over to the snapshot space area.  So right after the snapshot is taken, virtually no space is utilized.  And as things change over time, the snapshot space utilization increases.

Then at some point (hopefully) you’d delete the snapshot and the space would be returned and you’d be using less snapshot space.  Let’s say with daily snapshot scheduling (one snap per day for a week), eventually you’d move into a kind of steady state where you have the total utilization for the week be stable, with some minor peaks and valleys as snapshots get deleted and retaken.  So your utilization might be a little higher on Tuesday than it is on Saturday, but overall most of your Tuesdays will look the same.

RecoverPoint is really nothing like this.  Instead, abstractly, I like to think as the journal space as a bucket.  You put the bucket under your production LUN and any writes get split into the bucket.  Over time the bucket gets full of writes.  This happens for EVERY consistency group, EVERY time, and is why RP will ALWAYS use all journal space.  Of course the journal is oriented by time and this is where the bucket analogy begins to break down.  So let’s dig a little deeper.

Think of the RP journal as a line – like waiting to purchase tickets.  Or more accurately, a time line.  Whether you have one journal volume or multiple journal volumes, they still form this same line as a whole.  It starts out empty and the first write comes in and heads immediately to the front of the line, because there is nothing in it. Like this:firstwrite

That first, only write is now our oldest write in the queue (because again it is the only write!).

Subsequent writes queue up behind it.  Like this:

morewrites

Eventually the line capacity (journal capacity) is full and we can’t let anyone else in line, like this:

fullwrites

Now we are at kind of the steady-state from the journal perspective.  The writes at the front of the line (the oldest point in time) start falling off to make room for newer writes as they come into the queue.  You can imagine these blocks are just continually shifting to the right as new writes come in, and old writes fall off and are lost.

This timeline defines your protection window.  You can recover from any point in time all the way back to the oldest write, and how many total writes in the queue depend on how large the journal space is.  In this manner it is (hopefully) easy to see that RecoverPoint will always use as much journal space as you give it, and the more journal space you give it, the longer in time you can roll back to.

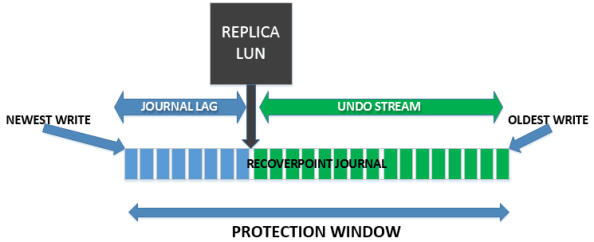
Since I’ve already got the graphics going, and as a bonus, let’s talk about the replica LUN.  The other thing that RP is doing is constantly updating the replica LUN with journal entries.  It figures out where the next write is going, reads data from that location which is inserted in the journal, and then writes the new data into that location.  As writes pile up, the “journal lag” increases.  Essentially the replica LUN is going to be, at any given point in time, somewhere along this line, like this:

REPLICA


You can see several things depicted in this graphic.  We have our entire timeline of the journal, which is our protection window, with the oldest write at one end and the newest write at the other.  We also have our replica LUN which at this very moment is at the state indicated by the black arrow.

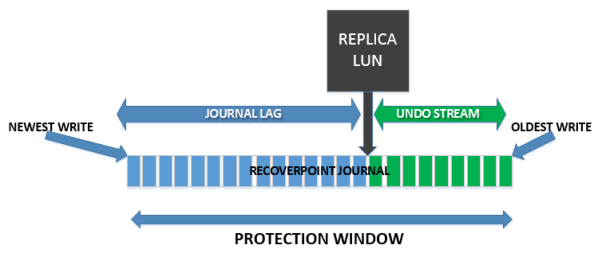
The writes in front of this black arrow are writes that have yet to be distributed to the Replica LUN.  These are the journal lag.  If a ton of new writes happen, more blue stacks up, more green falls off the end, and the Replica LUN state shifts to the right.  Journal lag increases, because we have more data that has not yet been distributed into the Replica LUN, like this.

replica_lag

The green blocks behind this represent the Undo Stream.  This is data that is read FROM the replica LUN and written INTO the journal for an undo operation.  So if RP was going to process that next blue block, it would first find the location in the Replica LUN the block was destined for.  Then it would read and insert the current data into the journal, which would be a new green block at the front of the green blocks.  Finally it would write the blue block into the replica LUN and the Replica LUN state would advance one block.  And if write I/O ceases for long enough (or there is just enough performance for the Replica operations to catch up), then the Replica LUN state moves up, the undo stream gets larger, and the journal lag gets smaller.

The Summary

In summary:

  • RecoverPoint will always use ALL of the journal space you give it, regardless of the activity of what it is protecting
  • RecoverPoint journal space can be seen as a time line, with the oldest writes on one end and the newest writes on another end.  This time line is the protection window
  • The Replica LUN, at any given point in time, is somewhere along the time line.  Any space between the Replica LUN and the newest write represents the journal lag.